It’s a brand new quarter, and chances are your Demand Gen team is hungry to launch an engagement program. As it turns out, they even have the proposed program outlined, including how they will determine success—5 unique clicks across different email assets.
You think about the possible ways to track this, and your first instinct is to set up a “clicks link” email trigger in Marketo. From there, you would just add the right link and the minimum number of time constraints possible. Done, right?
Well, not quite.
The constraint parameter you’ve added in this instance doesn’t actually account for unique clicks. Crap. Lucky for you (and the rest of us Marketo users out there), there’s another way to do this by using a custom field. Let’s set one up for this hypothetical situation together.
Setting Up a Custom Field
Step 1- Create A New Field
First, you’ll need to create a custom field in Marketo. It will need to be a “Score” type field, and it’s important to remember that this will only show up in your Marketo instance. Be descriptive in your field’s name, as it strictly pertains to this particular engagement program.
Suggested Naming Convention: “[Insert Your Nurture’s Name Here]-Score”
Step 2- Create Smart Campaigns for Your Emails
In your engagement program, you’ll need to create a smart campaign for each email in the nurture.
Suggested Naming Convention:
- “Clicks link in email – [Insert Email #1’s Name Here]”
- “Clicks link in email – [Insert Email #2’s Name Here]”
- “Clicks link in email – [Insert Email #3’s Name Here]”
- Etc…
Step 3- Set Up A Smart Campaign for Each Email
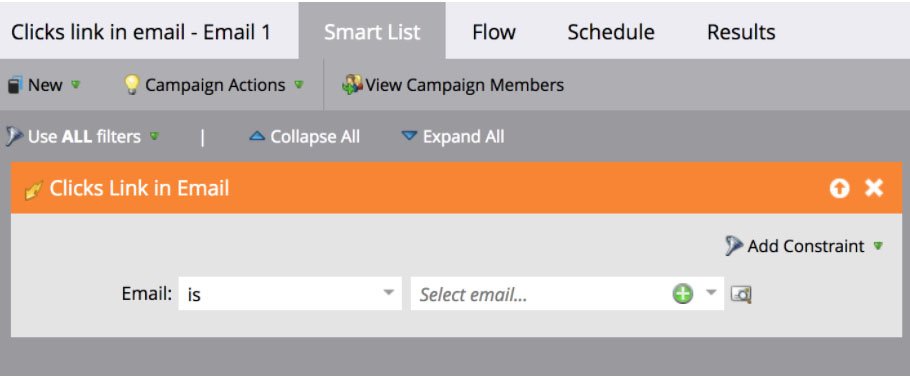
Let’s start with setting up a smart campaign for your first email in this engagement program. Navigate to the smart list tab in the email’s smart campaign and add the “Clicks Link in Email” trigger. Then, choose the email’s name.
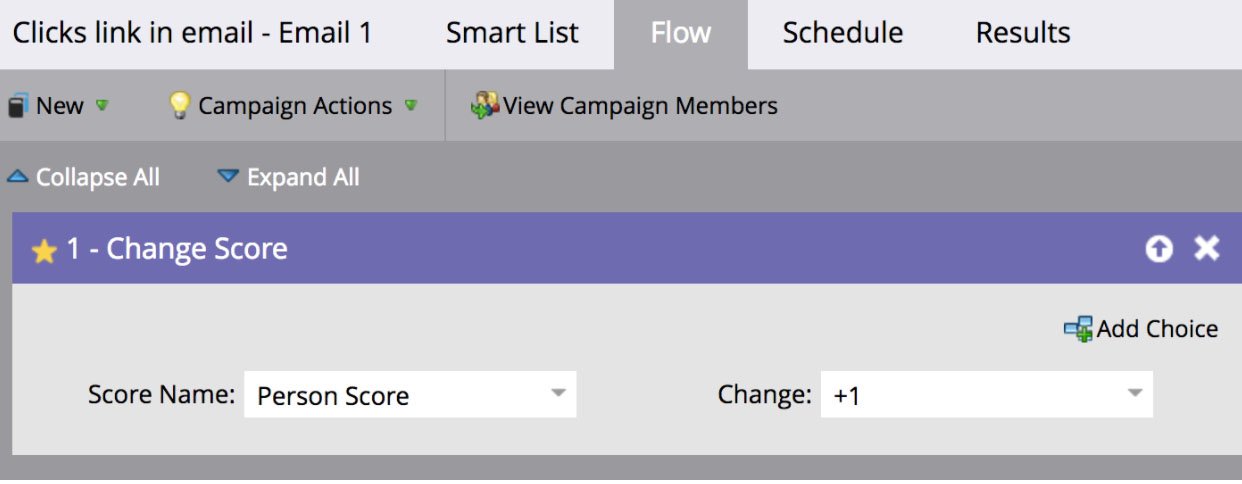
Next, in the flow step, drag in the “Change Score” flow.
Change the score of your custom score field to +1.
*Please Note: The “Score Name” should be the name of the custom score field you created back in Step 1 and not “Person Score” as shown in the example image below.*
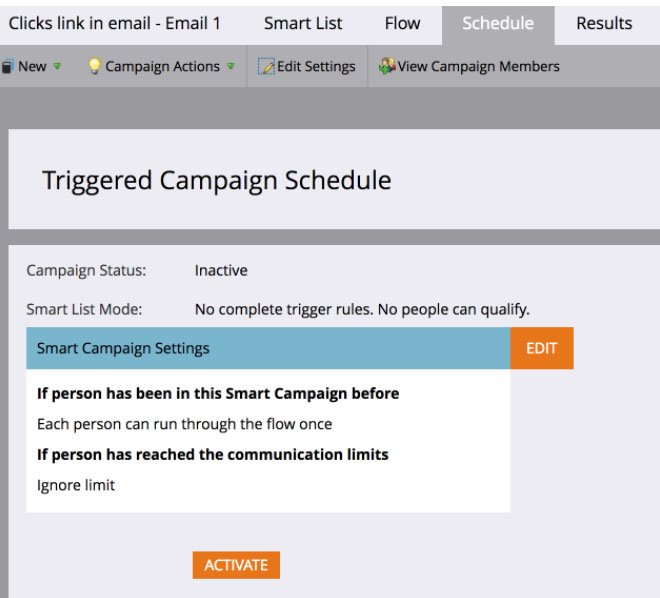
Now click on the schedule tab, double check to see that a lead can only run through the smart campaign once. This is important because you do not want a lead to get credit for clicking the same email multiple times.
Once you’ve finished creating your smart campaign for the first email, you can clone it for the other emails in the engagement program.
If you choose to clone it, just be sure to choose the appropriate email’s name for the “Clicks Link in Email” trigger.
Again, you will need to create a smart campaign for every email asset in your engagement program for this to work successfully, and before moving on to Step 4.
Step 4- Create A Smart Campaign for “Success”
You’re almost there! It’s time to set success.
Create one more smart campaign in your engagement program.
Use the “Score is Changed” trigger in the smart list tab and make sure you have selected the custom score field you created in Step 1.
*Please Note: The “Score Name” should be the name of the custom score field you created back in Step 1 and not “Lead Score” as shown in the example image below.*
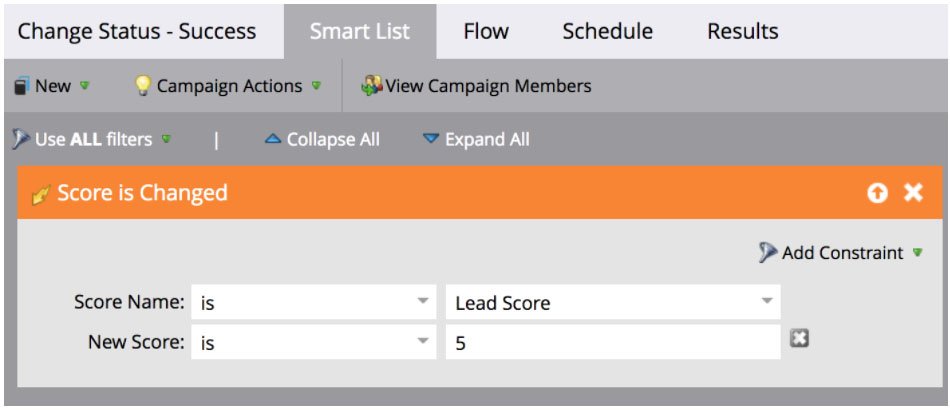
Add the constraint “New Score”. Since your Demand Gen team has defined success as 5 unique email clicks, then change the new score here to 5.
In the flow step, add “Change Program Status” and select the name of the engagement program. Now, change the new status to “success.”
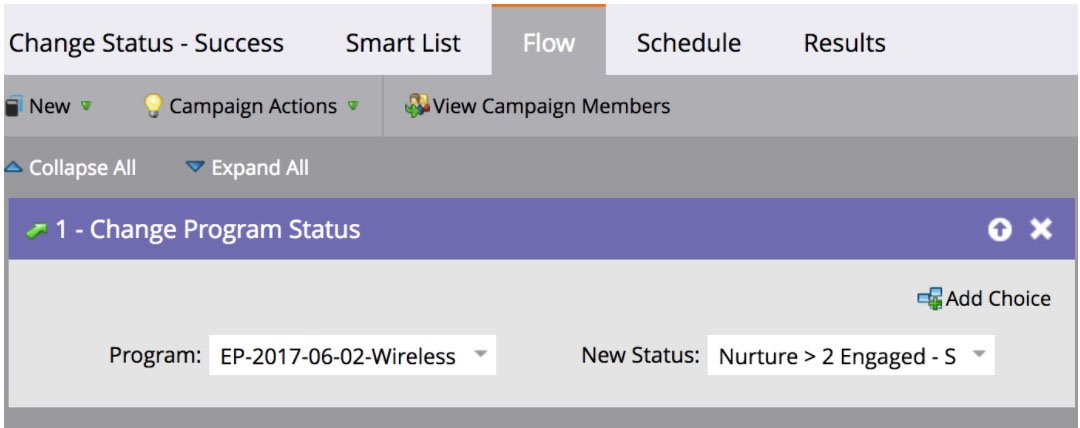
There you have it! You can now go back to your team with confidence that you have created an engagement program that fulfills all their requirements and will also give you accurate reporting.
Remember, you can customize this setup to do things like changing the score when they open an email instead of clicking it or require leads to click multiple emails before moving to the next stream, etc.


