Maintaining a clean database is one of the hardest–-and most time-consuming–-parts of a marketer’s job. To make things easier, we’ve created a step-by-step process full of best practices that will help you normalize key data sets in your marketing automation platform.
Step 1: Make a list of all the fields in your instance that you need to normalize. Oftentimes, these fields are used in lead routing (country, state), lead demographics (job title), or even company demographics (revenue, company size). Once you’ve got your list set up, prioritize them in order of importance.
Step 2: Starting with the highest priority field, pull down a list of historical values in your system. For the purposes of this exercise, we will focus on job title. Make sure to pull down values only for leads in the system with legitimate email addresses. You can bind the smart list criteria as shown below.

Step 3: Export the data into Excel, and dedupe the data based on job title. Then, take a look at the data to get a sense of which job titles seem to be trending. In other words, which types of job titles make up your instance? Hopefully, a large chunk of your database aligns with your company’s target personas. Take this data and set up a meeting with your marketing team. You’ll want to bring everyone together to gain a sense of how they’d like to segment their audience to align with their target personas.
Step 4: At your meeting with the marketing team, make sure you get answers to the following questions:
- Do we have existing fields that could be used?
- If not, how many new fields are needed?
- If creating new, what are we naming these new field(s)?
- What are the picklist values for the field(s)?
- Do the field(s) need to be created in SFDC or solely in Marketo?
- If more than one field needs creation, what is the relationship between the fields?
It may look something like this:
- Job Category
- Finance
- Information Technology
- Telecommunications
Step 5: If new fields are needed, create them yourself or send a ticket to the IT team. Then, take a first pass at your data to map out the job titles that clearly align to the new picklist values you’ve set up within the chosen fields. Once you’ve finished your first pass, make a list of some of the remaining unmapped job title values that appear to be trending.
Bring that list back to your stakeholders, and have them go through and map out some of the more obscure titles. You may have to go through this process with your marketing team a couple of times to ensure you’ve gone through your full list. You will get to a point where the remaining data set consists of dirty job titles. It’s important to have an “Other” category where you can map all of these values.
Step 6: Create an operational program in your Marketo instance. Create a folder labeled “Historical Uploads”, and build a static list. Import your Excel spreadsheet into the new static list. We recommend only importing email addresses and the new fields you’ve mapped to, and just like that, you’ve taken care of your historical update.
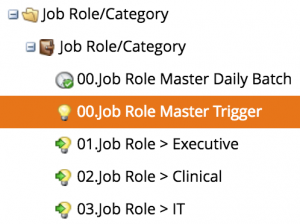
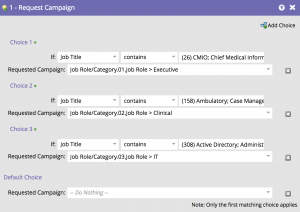
Step 7: Within your operational program, build out a set of smart campaigns to listen for changes to the job title field. We recommend building a central “master” smart campaign that uses a series of request campaign flow steps to send the data to the appropriate campaigns for data value changes. The master should be a trigger campaign and a separate batch campaign that runs daily to clean up any loose ends. Here’s an example of how you can set up your master trigger campaign:

Smart List:

Flow:

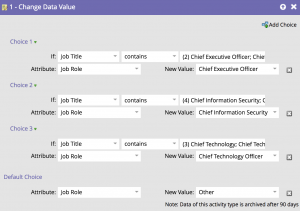
Step 8: Build the individual smart campaigns for each job category you have outlined. The smart list batch filter outlined below should have all of your job title variations that you and your marketing team identified as relating to this specific job category. Next, break them out in the flow step to push the job title variation to the correct job category value.
Smart List:

Flow:

Step 9: Test, test, test! Run through your logic by testing it out before opening it up to your entire database. Correct any errors that pop up. Once tested and approved, activate your trigger campaign and set up your recurring batch campaign.
Step 10: Create a lead performance report and group by your new field. Have this sent to you and the team daily, weekly, monthly or on any other schedule that works best for your needs. This gives you and the team a look into the health of the data set, which means you can quickly correct any issues that occur in the future.


